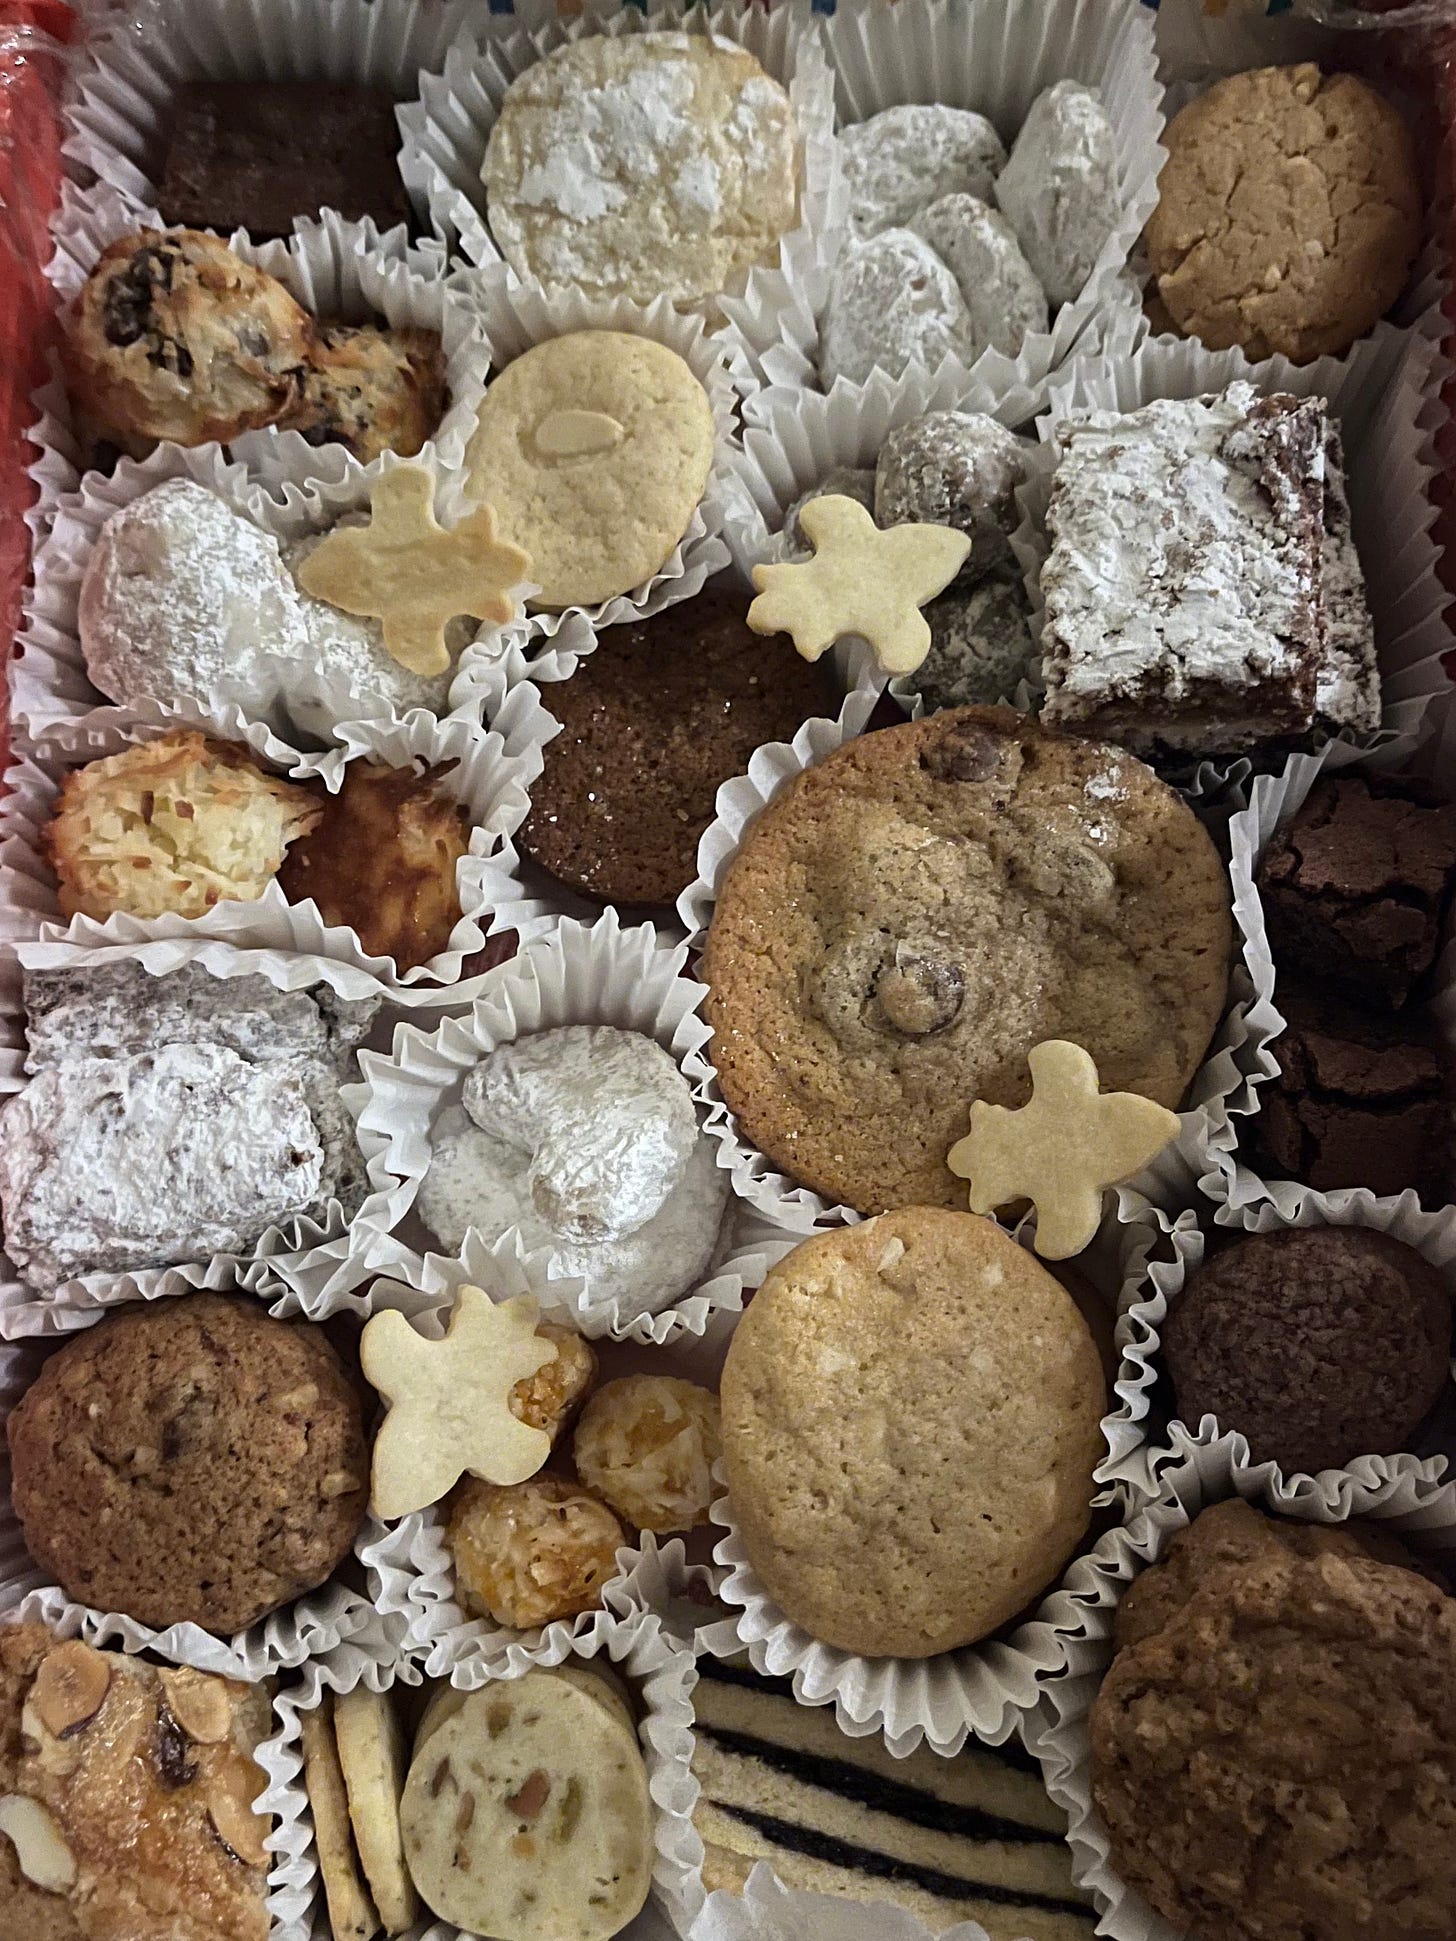
I have never been much of a Christmas cookie baker. Instead, for the past several years, I’ve been the lucky recipient of my friend Liz’s elaborate cookie box, an endeavor that takes at least three family members and several days. Together, they produce thousands of cookies. As we get closer to the holiday, I wait eagerly for the text that lets me know she’s on her way to drop off the tin, filled with a perfect assortment of traditional Christmas cookies and southern favorites - pecan crescents, rum balls, lemon crinkles, chewy coconut macaroons, tiny fleur de lis-shaped shortbread, and more. Liz, if you’re reading this, I love you.
Liz’s cookie box
Last Christmas, however, I was struck by the urge to develop my own Christmas cookie arsenal. I’m influenced as ever by my friend Tim Mazurek, who takes his cookies very, very seriously. I love Tim’s essay about them, particularly the notion that Christmas cookies are, against the odds, a stubbornly secular tradition:
“For this non-Christian who loves Christmas, the modern season is most fully encapsulated in the holiday cookie platter, a generous fantasia where butter cookies decorated like angels mingle with rugelach and rum balls. The cookie platter doesn’t care about your religion, or lack of one. It welcomes everyone and promises that you’ll find something you like.”
As a fellow non-Christian who loves Christmas, I’ll think about this passage every season, perhaps forever. It inspired me to develop three holiday cookies last year - a crunchy, wheaty espresso digestive, a chewy panettone cookie chock full of dried fruit and topped with pearl sugar, and a tangy pistachio cranberry bar (that’s incidentally vegan). If you make only one, I can still say the digestive is my favorite.
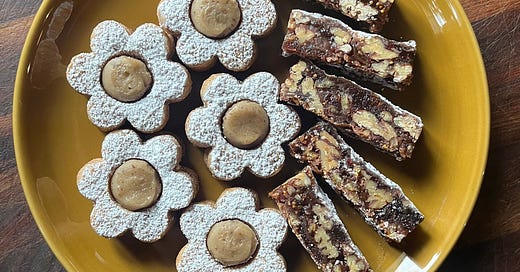
This year, I have two for you: a chestnut sandwich creme and maple pecan panforte. To be totally honest they are both a little finicky to put together, but I think they are some of my best work. The chestnut cookie requires you to find peeled, pre-cooked chestnuts, which are often sold in little vac-sealed packets or jars. This might strike you as difficult to find, but I sourced them at Costco, World Market, Whole Foods, and Wal-Mart this year, and you can always try online. I’ve never roasted and shelled my own chestnuts but it sounds like too much work!
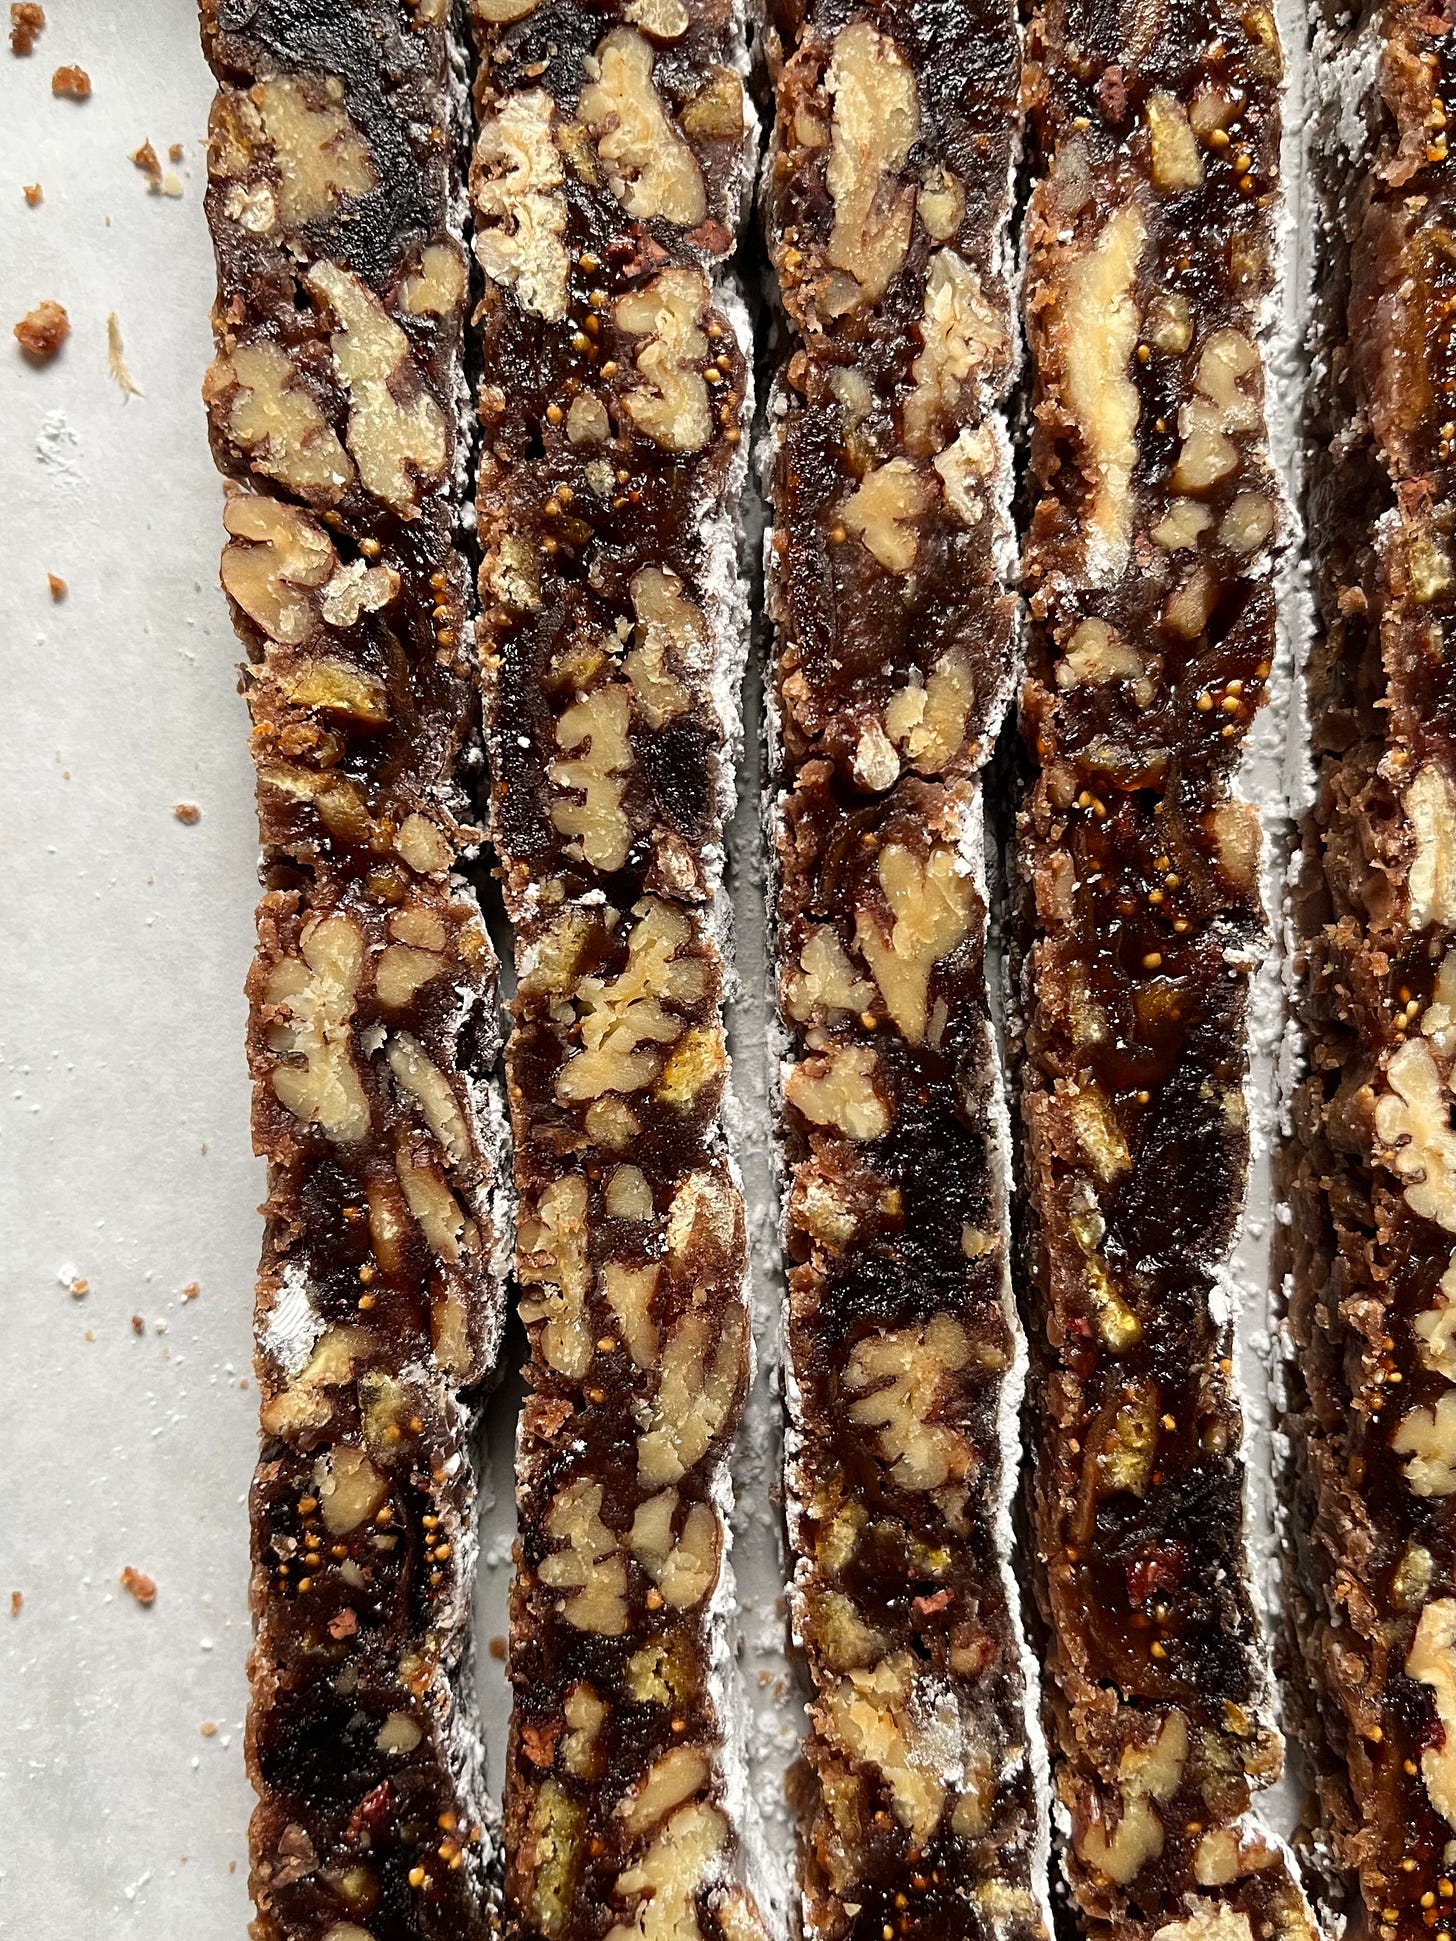
If you’re not familiar with panforte, I often think of it as if fruitcake was a confection - a sweet, chewy, nutty slice, redolent with winter spices. I had it for the first time when I worked for Michelle Polzine in San Francisco ages ago, who would serve it on cheese plates. I think it works equally well in a Christmas cookie box, and it keeps for ages. Traditionally made with honey and almonds, I’ve substituted maple syrup and pecans to give it a distinctly North American edge. I want to enjoy it with a glass of amaro soon.
Without further ado: the recipes. You can click the links below for printer-friendly versions or scroll down to see them complete with pictures.
Maple Pecan Panforte (click through to print)
Chestnut Sandwich Cremes (click through to print)
Maple Pecan Panforte
Makes about thirty-two portions
This version may offend the Italian traditionalists, but if living in New Orleans has taught me anything, it is that Italian-Americans (and Creole Italians in particular) make magic when they adapt their culinary traditions to what is available where they currently live.
I bake my panforte in an 8” square baking pan rather than the traditional round because I think it makes it easier to portion into neat rectangles for gifting. I have a square pan with a removable bottom which makes removing the cooled panforte considerably easier - if you don’t have a similar pan, then I would recommend a 9” round springform. Many panforte recipes feature an addition of melted chocolate, but I found that it muted the maple flavor. I add just a tablespoon each of cocoa powder and cocoa nibs instead. I also add a touch of corn syrup to prevent the maple syrup from crystalizing as it cooks. You could substitute glucose if you have it.
Judging the “doneness” of a cooked panforte can be tricky, because it will still feel quite molten when you remove it from the oven, and firm up as it cools. I would err on the side of underdone than over, as a too-firm panforte could break a tooth. I allow my own to cure completely overnight before portioning. If it still feels a bit sticky or soft when you go to divvy it up, you can pop it in the freezer for a few hours, cut it into neat slices, and let it come to room temperature. You’ll want to cut it with a sharp serrated knife, using short sawing motions to neatly slice through the pecans, revealing an appealing terrazzo of fruit and nuts.
A last note - I would recommend sticking to the ratio of dates I’ve included here. A version I made with more dates turned out far too sweet. I’ve also included imperial measurements, though I recommend you stick to the weights, as dried fruit and nuts can vary so much in volume when piled in a measuring cup.
Ingredients:
188 grams / two cups whole pecans, toasted
155 grams / 1 cup dried figs, chopped
113 grams / a packed ½ cup dates, chopped
50 grams / a scant ½ cup candied orange peel, chopped
1 tablespoon cocoa nibs
90 grams / ¾ cup all-purpose flour
1 tablespoon cocoa powder
½ teaspoon cinnamon
½ teaspoon kosher salt
¼ teaspoon five spice powder
¼ teaspoon freshly grated nutmeg
⅛ teaspoon freshly ground black pepper
200 grams / ⅔ cup minus one teaspoon maple syrup
164 grams / ¾ cup plus one tablespoon granulated sugar
22 grams / 1 tablespoon corn syrup
28 grams / 2 tablespoons butter
A couple tablespoons of confectioner’s sugar
Preheat the oven to 325 degrees.
Prepare your pan by spraying the heck out of it with pan spray - I use Pam. Then line the bottom with parchment paper and spray again. I use an extra long piece of parchment so that I have a sling to help pull the finished panforte out of the pan.
Combine your pecans, cocoa nibs, chopped dates, figs, and orange peel in a bowl. In another bowl combine the flour, cocoa, salt, and spices and whisk to combine. Toss the dried fruit and nuts in the dry ingredients, taking care that all the pieces of dried fruit are adequately separated. Place this bowl near the stove, and set the butter nearby so it's close to hand.
In a small non-reactive pot, combine the maple syrup, corn syrup, and sugar. Cook the syrup mix over medium heat, stirring gently with a heat proof spatula, until the sugar is dissolved. Using a candy thermometer or an instant-read thermometer, continue to cook the syrup until it hits 240 degrees - this should take about a minute and a half from when the syrup begins to boil. Pause for a beat so that the syrup can carry to about 243 degrees, then turn off the heat and add the butter, followed by the dried fruit mixture. Stir it vigorously until it is well combined - it will feel quite thick. Scrape the mixture into your prepared pan. I like to use a greased square of parchment paper to press the mixture into an even layer, though you could use gloved hands if you like. It will be very thick, and the panforte mix will cool rapidly and won’t be too tricky to handle.
Place the panforte in the oven and bake for forty minutes. When you remove it, it will still feel soft in the middle and may be bubbling lightly at the edges - it will firm up a lot as it cools. I like to let it cool for about twenty minutes in the pan, and then take a sharp knife or offset spatula and run it around the edge of the pan to separate it from the sides. You can then carefully flip it out onto a clean work surface. It may still feel a little sticky and soft - this is normal. You don’t want to let it cool completely in the pan, as this will make it difficult to unmold. Carefully peel off the parchment paper from the bottom of the panforte. Sprinkle the panforte with the confectioner’s sugar, rubbing it into the surface, and let cool completely. Allow it to cure overnight before portioning (or freeze it for a little while if you’re in a rush). You can store it wrapped tightly in plastic wrap or beeswax-coated cloth for several months at cool room temperature.
Chestnut Sandwich Cremes
Makes about 24 sandwich cookies
The flavor profile of these cookies is very simple, but the result is magical. Brown butter shortbread is rolled thin and baked until crisp, then filled with a soft and nutty chestnut cream. When eaten fresh, you get all the textural contrast between the crunchy sables and the rich filling, but I almost prefer them when they’ve sat overnight and everything melts together in your mouth. I tinkered with this recipe quite a bit to get the textures right, and by the time I was finished I could not be bothered to reverse engineer this recipe back to imperial measurements. I only offer this recipe in grams (it’s worth it).
Pre-cooked and peeled chestnuts aren’t appealing as-is, but when simmered until very soft in a rum simple syrup and blended with butter and salt, the starchy chestnuts transform into a velvety ganache-like texture with a flavor that's difficult to describe. People sometimes say they taste like sweet potatoes, but they remind me more of sweet boiled peanuts (complimentary). Fair warning: the recipe for the chestnut cream below makes twice as much as you need. I found when I tried to make smaller amounts that it was difficult to blend. You need a certain volume of material to “catch” the blades of small food processors, and the remaining chestnut cream freezes well, anyway. Use the leftovers to spread on french toast, put on the side of a cheese plate, or add a little egg white and bake it up like a frangipane. The French even use creme de marrons, the paste made from broken bits of candied chestnuts, as a mix-in to their breakfast yogurt.
A note on the brown butter shortbread: you’ll need to brown butter for this recipe (obviously), but different types of butter have different water contents, and the finished weight will vary. To get around this, you should brown a stick of butter and then make up the weight with uncooked butter until you get to 170 total grams. There are more details below.
Brown Butter Shortbread Ingredients:
170 grams butter
85 grams granulated sugar
255 grams all purpose flour
½ teaspoon plus ⅛ teaspoon kosher salt
1 tablespoon plus 1 teaspoon whole milk
1 teaspoon vanilla extract, or a dash of vanilla paste
Confectioner’s sugar, for sprinkling
Place 112 grams of butter in a non reactive pot and cook over medium heat, stirring frequently, for about five minutes, or until the butter solids have browned and taken on a nutty aroma. Meanwhile, set the bowl of a stand mixer on a scale and tare it. When the butter is deeply browned, scrape it into the bowl of the mixer and add a chunks of cold butter, a little at a time, until it reaches 170 grams in weight. At this point, the cold butter will have cooled the brown butter down considerably, but we still will wait until the mixture has reached room temp before proceeding. You can speed up this process by placing the mixing bowl in the fridge and giving the butter a little stir every now and then until it’s cooled to a pliable (but not liquidy) consistency.
At this point, add the sugar and cream the butter/sugar mixture together with a paddle attachment for about one minute. You don’t want the creamed butter and sugar to be too light and fluffy - we rely on undermixing it slightly to achieve the shortbread's fine-grained, crunchy texture. After a minute, add the flour and salt and mix just to combine. Add the milk and vanilla and finish mixing by hand until a soft dough has formed.
Immediately roll out your shortbread dough. I like to roll it out between a silicon mat and plastic wrap, obviating the need to use any additional flour (and risking toughening the shortbread). You can also roll it out between two sheets of parchment. The ultimate goal is a uniform sheet of shortbread just under a quarter inch in height. Slip the shortbread onto a half-sheet tray and refrigerate (or freeze) until firm.
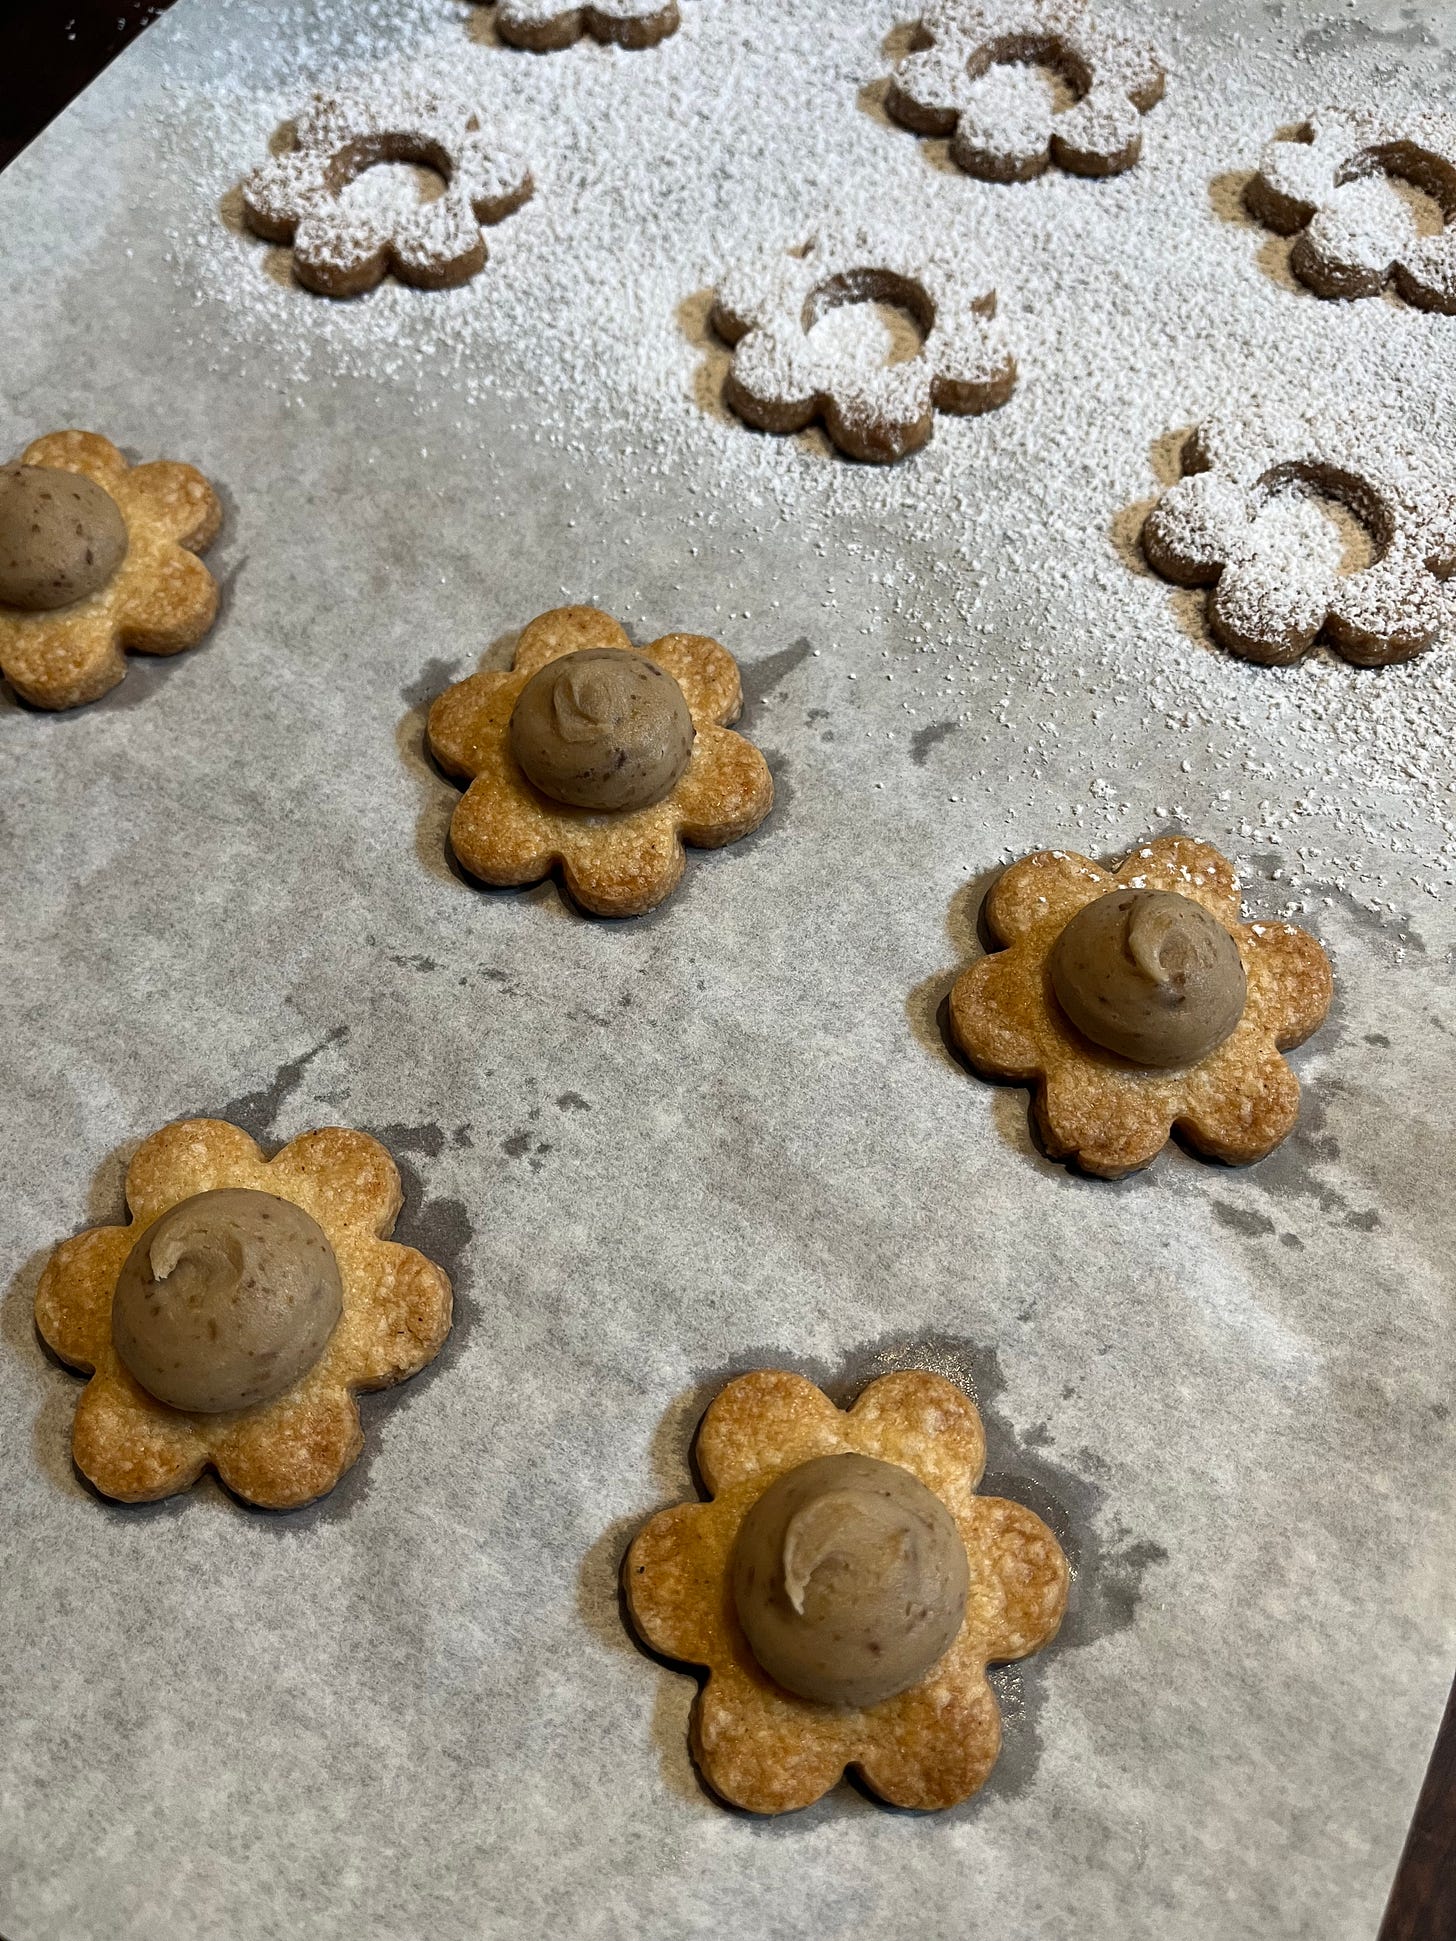
Punch out your cookie rounds. You’ll want to use a cutter between 1½ and 1¾ inches in diameter. I like to take half my rounds and punch a cute shape out of the center, like you would with a linzer cookie, but you don’t have to. You can re-roll your scraps once, or even twice if you’re careful not to over mix it.
Preheat an oven to 350 degrees. Arrange your shortbread rounds on two sheet trays - you can place them pretty close together, as they won’t spread much. Bake for 13-15 minutes, rotating the trays front to back and top to bottom halfway through, until the cookies are pale golden brown.
Once the cookies have cooled, sprinkle the confectioner’s sugar on the “top” halves.
Chestnut cream ingredients:
150 grams water
150 grams sugar
1 tablespoon plus 1 teaspoon rum
1 teaspoon vanilla extract, or a dash of vanilla paste
Heavy pinch kosher salt
8 ounces / 226 grams peeled, pre-cooked chestnuts
56 grams butter, cold and cut into chunks
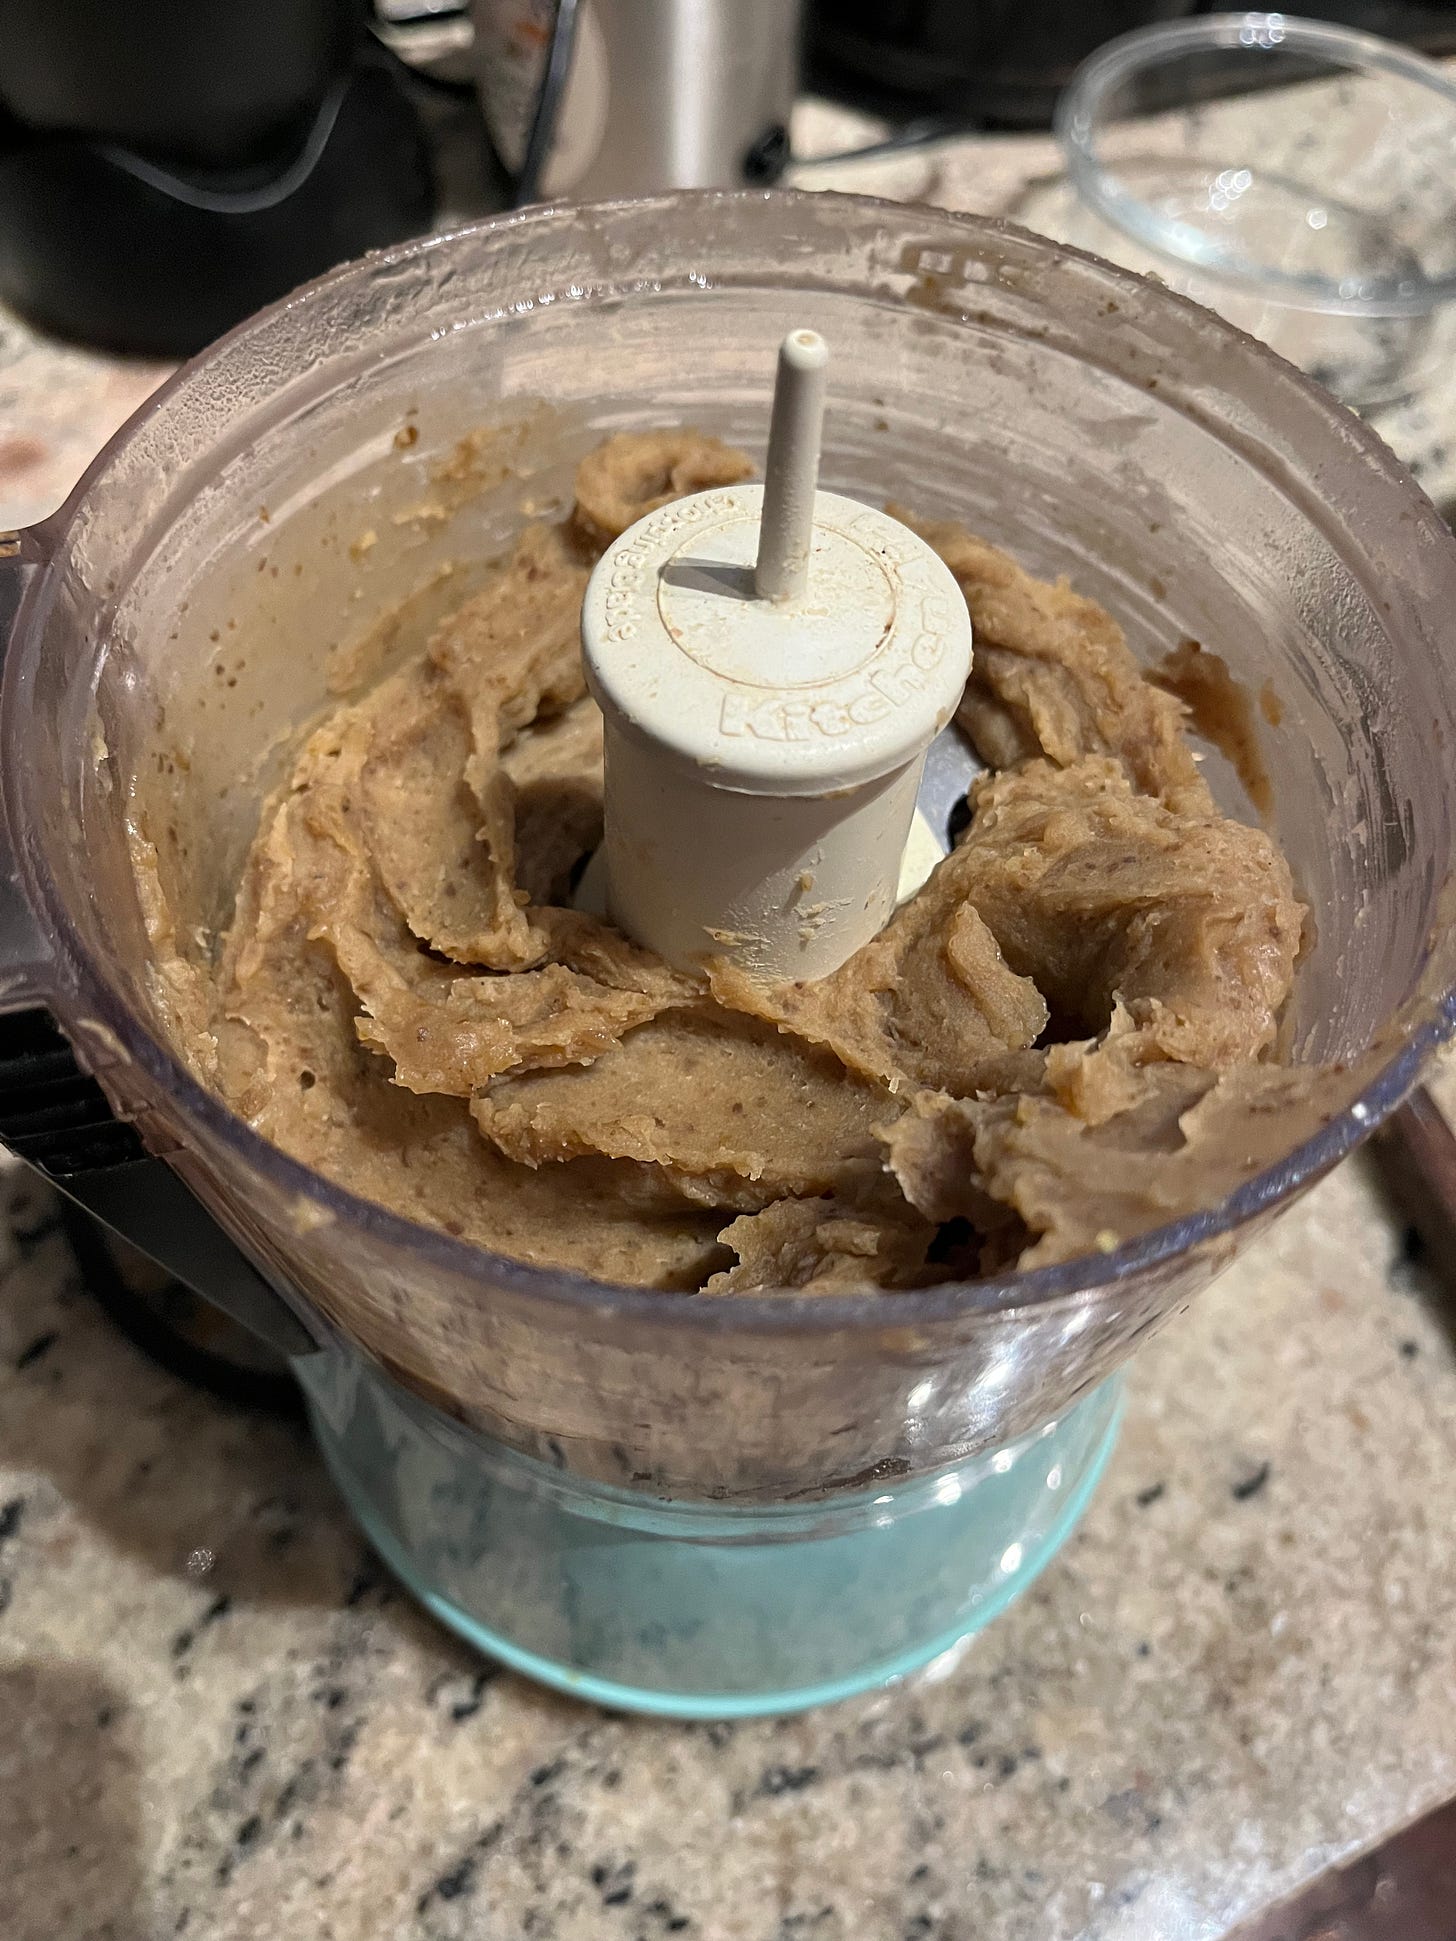
Combine the water, sugar, rum, vanilla, and salt in a small non-reactive pot and warm over medium heat until the sugar is fully dissolved. Add the chestnuts and simmer them for about ten minutes, stirring occasionally, until they are very soft. Use a heatproof spatula to smash the chestnuts against the side of the pot until they’re all broken up.
The chestnut puree before adding the butter.
When the sugary syrup has reduced until quite thick and the chestnuts are all soft and broken, scrape the mixture into a small food processor or blender, like a Magic Bullet or even a large spice grinder (I achieved this successfully in three different appliances). Puree the soft chestnuts until they are very fine and nearly smooth. Add the cold butter and continue to blend until the butter is fully melted and the chestnut cream is even smoother. If you need to, you can add a dribble of water or rum to thin it out. Taste the mixture and add a little more salt if you like. Allow to cool fully to room temperature.
To assemble
When the brown butter shortbread is fully cooled, take the bottom half of your cookie sandwiches and pipe a generous dollop of chestnut cream on them. Top them with their confectioners-sugar dusted tops. The cookies keep at room temperature for up to three days.





Both of these recipes look delicious and I LOVE the quote from Tim Mazurek. As a former christian turned atheist, I am all about embracing the cookie platter as one of the best ways to celebrate the season.
Wow! These look so good! For the chestnuts, I often see them sold at Asian markets in small vacuum sealed pouches as a snack. They are kind of wet and soft when you take them out. Are these the chestnuts you’re talking about?